Azure DevOps Pipeline Tutorial – Part 1: CI pipeline fundamentals
In part one, of a two-part blog post, Penny Xuran Qian, Machine Learning Engineer at ABN AMRO, explains how to set up, implement and run your first CI pipeline on Azure DevOps. In part two (coming soon), Penny explains how to convert this pipeline into a reusable template and add more features. Read more below.
By: Penny Xuran Qian Machine Learning Engineer at ABN AMRO
Source: ABN AMRO Developer news
Continuous integration (CI) is the practice used by development teams to simplify the testing and building of code. CI helps to catch bugs or problems early in the development cycle, which makes them easier and faster to fix.
Continuous delivery (CD) is a process by which code is built, tested, and deployed to one or more test and production stages. Deploying and testing in multiple stages helps drive quality.
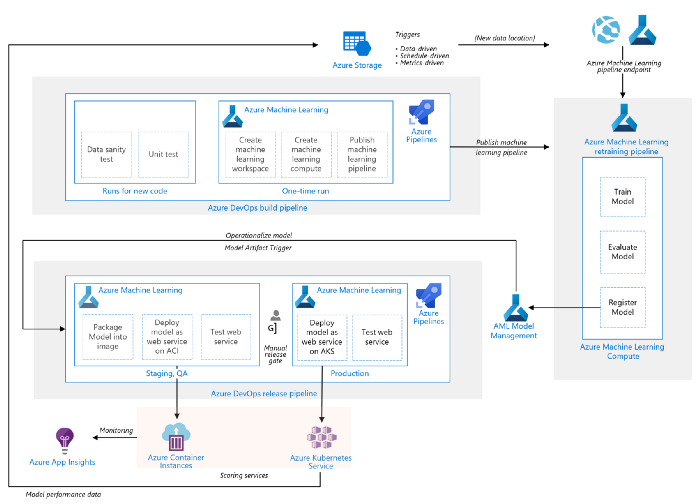
A CICD pipeline can consist of multiple components. To implement our CICD pipeline, we used Azure Pipelines as part of Azure DevOps Services.

Now we know the key concepts of a CICD pipeline and how it works on Azure DevOps, we can start building the first CICD pipeline on Azure DevOps.
There are multiple ways of setting up the CICD pipeline on Azure DevOps. In this introduction, we will start from a simple one via YAML definition.
Azure Pipelines doesn’t support all YAML features. Unsupported features include anchors, complex keys, and sets. Also, unlike standard YAML, Azure Pipelines depends on seeing stage, job, task, or a task shortcut like script as the first key in a mapping.
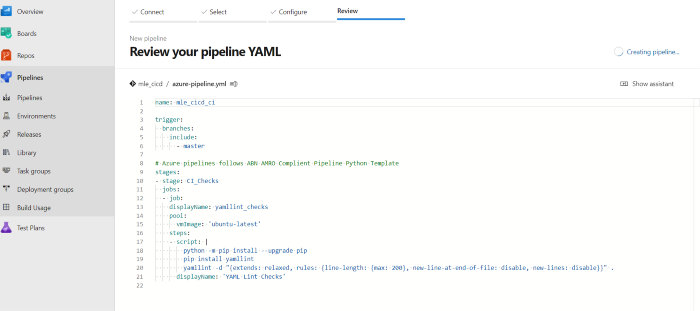
TemplateRepomaster branch.# Repo: MySpace/TemplateRepo
# File: azure-pipeline.yml
name: cicd_ci
trigger:
branches:
include:
- master
stages:
- stage: CI_Checks
jobs:
- job:
displayName: yamllint_checks
pool:
vmImage: 'ubuntu-latest'
steps:
- script: |
python -m pip install --upgrade pip
pip install yamllint
yamllint -d "{extends: relaxed, rules: {line-length: {max: 200}, new-line-at-end-of-file: disable, new-lines: disable}}" .
displayName: 'YAML Lint Checks'
View rawazure-pipeline.yml hosted with ❤ by GitHub
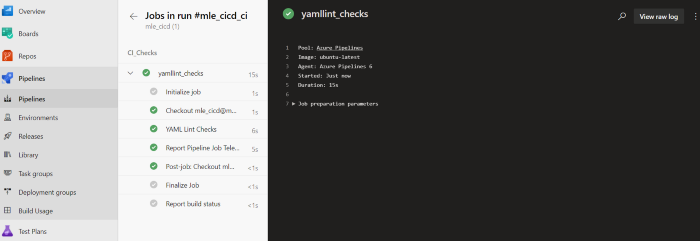
cicd_cimaster will trigger a buildCI_Checks , within this stage, there is one job with a friendly given name yamllint_checks . The job runs by the Microsoft-hosted agent uses VM image ubuntu-latestNow, we can create a new pipeline using this YAML definition. Go to your DevOps, on the left panel, Pipelines -> Pipelines -> New pipeline (a button on top right corner), then you will enter the page below. Depends on where your YAML file is located, you can choose where to import it:
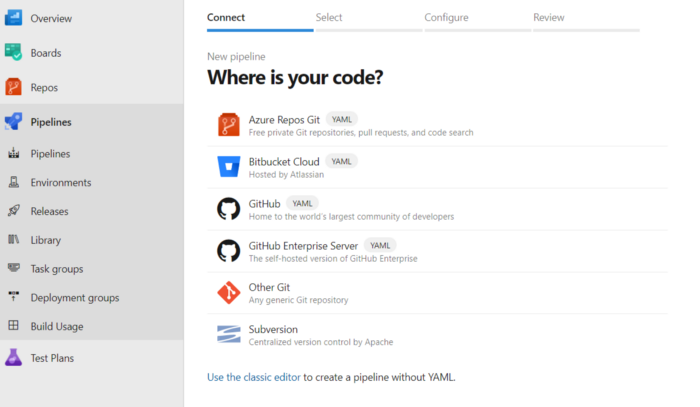
In our case, we pick Azure Repos Git and then select the repository name and YAML definition.
Once the import is done, you can run your first pipeline. The pipeline run page provides a summary that contains information relevant to this pipeline run. Because we set the pipeline trigger as branch as `master`, which means the changes to the master branch will automatically start the pipeline run.

The running status of our defined stage CI_Checksand job yamllint_checks are showed here. You may notice that except our defined step YAML Lint Checks , there are multiple steps we did not specify, for example, Checkout xxx these are initialized and tear-down steps defined by default.
We will briefly cover the complex pipeline and execution orders as well.
So far we defined a simple pipeline, with one stage, one job, and one step. A pipeline, in reality, can consist of multiple stages, jobs, and steps. For example, deployment to different environments can be defined as multiple stages, within each stage multiple jobs are defined, demo as the following structure:

Such a pipeline definition will have a linear series of stages, jobs, and steps, in YAML like:
Pipeline
  - Stage A
    - Job 1
      - Step 1.1
      - Step 1.2
      - ...
    - Job 2
      - Step 2.1
      - Step 2.2
      - ...
  - Stage B
    - ...
To let such a complex pipeline run to our desire, the understanding of the order of stages/jobs/steps is critical. This link includes the order of a detailed step that how Azure Pipelines go through the steps, we won’t copy-paste the same text here. To summarize:
To follow up, Penny will publish a second part of the Azure DevOps Pipeline Tutorial. It will explain how to convert this pipeline into a reusable template and add more features. The second part will be posted soon!
Read more articles like this here!
Lees meer van dit soort artikelen hier!