Next time you’re putting together some CSS3-based animations you might find it helpful to jump into Chrome Developer Tools and take advantage of its animation inspection and tweaking features. In this quick tip we’ll give you a rundown of which animation dev tools are available in Chrome, how to access them, and what they can do for you.
As you go along, if you’d like some CSS3 animations to test each of the tools on you can use this pen from our course 10 CSS3 Projects: UI and Layout:
Opening the Animations Tab
On a page with a CSS3 animation running, first open the Chrome Developer Tools by going View > Developer > Developer tools. Alternatively you can use a keyboard shortcut, either F12 or CTRL + SHIFT + I.
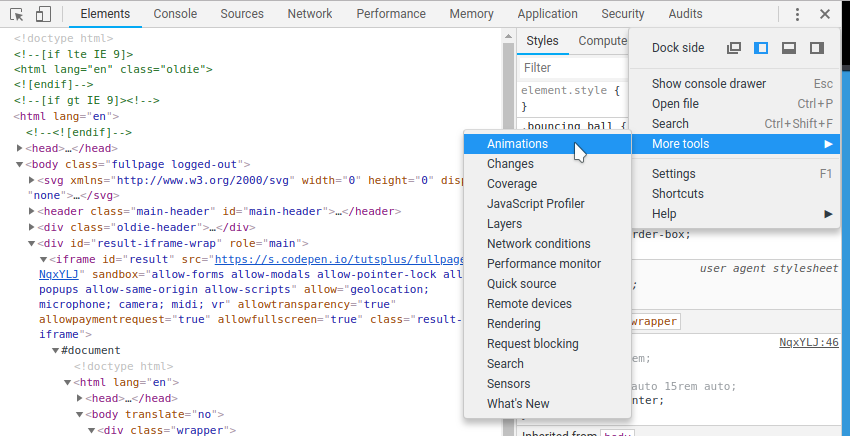
Once the dev tools are open, go to the menu symbolized by three vertical dots at the top right corner, then choose More tools > Animations as shown below:

When you first open the animation tab you won’t see any content related to your animations, you’ll just see a message saying Listening for animations... The reason for this is, in order to work, the tab needs to already be open when the page is first loaded.

To allow the panel to capture information on your animations, refresh the page and you’ll see this:

The little colored graph icon at the top left represents your page’s animations. Click on that icon to open the animation inspection tools:

The Playhead and Keyframes
As the animations play you’ll see the red playhead moving across the timeline. This playhead can be grabbed with the mouse and manually scrubbed, or placed at a specific point.
Each line on the interface represents an individual animation in the page. You’ll notice each line has a portion with darker, more saturated color. This indicates the length of the animation, and the lighter segments that come afterward represent the animation repeating itself.
You’ll also see several small circles along each animation line. These correspond with the animation’s keyframes. The dark colored circles represent the beginning and end of the animation, and the hollow circles represent interstitial keyframes anywhere between.
Interstitial Keyframes
The interstitial keyframes (keyframes between the beginning and end of each animation cycle) on each line can be dragged to different positions and as you move them you’ll see the animation in the browser window change its timing. This can be great for experimenting with exactly what percentage point an interstitial keyframe should fall at.
The tricky part, however, is you won’t see any update to the code in the Styles tab while you conduct these experiments. Instead, when you do get your interstitial keyframes placed at just the right point, you can manually figure out what percentage value a keyframe should be set to use.
Place the playhead directly over the keyframe in question and you’ll see a time stamp at the top left of the panel telling you how far along the animation you are in seconds. You can then figure out what percentage this time is of the overall animation duration. In the example below the playhead is at about 1s of a 2s animation, so we know this keyframe is at 50%.

Animation Delay and Duration
There are other changes you can make in the Animations tab that will update your code in the Styles tab so you can see exactly what values to transplant into your CSS. The first of these is the delay before an animation begins playing, and the second is its duration.
To adjust the delay before an animation plays, hover over its line until you see a hand shaped cursor, then drag horizontally. You’ll see the delay value updating in the Styles tab:

To modify the animation’s duration, hover over its last keyframe until you see a double-ended arrow cursor, then drag horizontally. Again, the value will be seen updating in the Styles tab.

Animation Timing Function
You can also use Chrome’s dev tools to modify the speed curve that controls an animation’s timing. Start by inspecting an element that has an animation applied to it. To the left of the currently specified timing function you’ll see a small box with a “squiggle” in it. Click it to open the cubic bezier editor:

A box will open showing you a bezier curve that illustrates the current timing function. From here you can choose an existing preset by clicking one of the thumbnails on the left, or you can drag the handles of the main curve image around around to create a custom cubic-bezier value you can subsequently copy into your CSS:

As you go along you’ll see a little purple ball animating from left to right across the top of the editor, giving you a preview of your timing function in action.
Learn more about bezier curves and timing functions in this coffee break course:
 AnimationEasing in to Cubic Bezier Functions
Rotatable Layers Visualization
Another extra helpful feature is the ability to visualize the layers used in your animation, including the option to rotate said visualization and look at it from various angles to better understand how things are working.
To open the Layers panel, go to the Chrome Dev Tools menu and choose More tools > Layers.

Once the Layers tab is open, choose the Rotate mode tool at the top left:

You can now use this tool to rotate the layers visualization onto any angle you need in order to best see how the parts of your animation are working:

Wrapping Up
Let’s a have a quick summary of Chrome’s animation dev tools:
- Open the animation tools by first opening Chrome Dev Tools, then under the dev tools menu choose More tools > Animations.
- The Animations panel needs to already be open when the page is loaded to capture info on animations–refresh the page to achieve this.
- Click the little colored graph thumbnail to view animation information.
- Each line represents an animation.
- Filled circles represent beginning and ending keyframes.
- Hollow circles represent interstitial keyframes.
- Interstitial keyframes can be moved, but you won’t see the related code update in the Styles tab–instead, manually calculate the percentage point they fall at.
- Modify an animation’s delay value by hovering over its line till you see a hand cursor, then dragging horizontally.
- Modify an animation’s duration value by hovering over its last keyframe until you see a double ended arrow cursor, then drag it horizontally.
- In the Styles tab, click the icon to the left of the existing timing function to open the cubic bezier editor.
- Choose from timing function presets here, or create your own by modifying the main curve image.
- Open the Layers panel by going to the Chrome Dev Tools menu and choosing More tools > Layers.
- In this panel, use Rotate mode to view the layers of your animation from any angle.
Sometimes making an animation look just right can be a very precise and finicky process. These tools can give much needed insight into your animations, as well as real time feedback, to help you get everything perfect